Why do many researchers prefer polyclonal antibodies for an IHC/IF assay?
Rather than monoclonal antibodies, experienced scientists prefer to use polyclonal antibodies in IHC/IF assays

Frozen sample Preparation for Immunohistochemical Assays in regular biological Research Labs
In histology, the paraffin section and frozen section are commonly used methods, the former is often used for immunohistochemical assays (IHC), and the latter is often used for immunofluorescent staining (IF). Prior to the discussion of how to prepare the frozen sample for IF assay, let’s take a look at the pros and cons of each.
Comparison of advantages and disadvantages: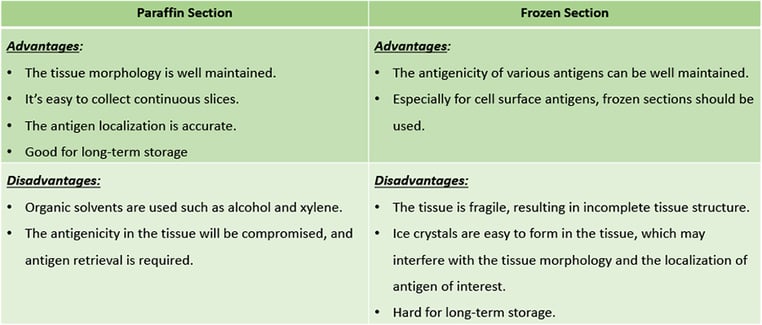
As compared to the complex process of paraffin sample treatment, the preparation of frozen samples is much easier, especially for researchers who are not working in a histopathology lab environment. Here, the Bioss expert walks you through the frozen sample preparation step by step.
Before planning a frozen section project, please note that:
Procedure
Please always be aware that it is important to keep fresh tissues on ice and process them within 5-10 minutes of devascularization to well preserve the nuclear acid and protein in the fresh tissue samples.
Avoid crushing artifacts by gently but firmly securing the specimen while cutting.
A smaller size is preferred as it can be frozen faster than a larger one. While you prepare the fresh sample for the frozen section, the thickness could be 1 cm or a little bit more.
The sample can be fixed before or after the collection. If the sample has been fixed with formaldehyde fixatives, it should be rinsed with 1×PBS for 10 minutes, 3 times, transferred into 15% sucrose in 1×PBS at 4°C until tissue sinks, then transferred into 30% sucrose in 1×PBS at 4°C until tissue sinks. You might need to perform an antigen retrieval procedure to expose the epitopes due to the cross-linking effect of aldehyde fixatives when performing immunostaining on these samples.
Remove excess liquid surrounding the tissue by absorption with Kim-wipe prior to freezing. This liquid will form ice crystals on the surface of the tissue and prevent tissue attach to frozen embedding media (e.g., OCT compound). This step only takes a few more seconds, but it will make a dramatic difference in the sectioning process later on.
An ideal snap-frozen should be able to freeze down the tissue relative quickly and evenly. Because the faster you freeze down the samples, the less chance of ice crystal artifact will occur. But on the other hand, freezing tissue too quickly, such as submerging the tissue directly into the liquid nitrogen will cause the tissues or blocks to crack, which will make them very difficult or impossible to section. This happens because the outside tissue begins to freeze much more quickly than the internal portion. After reviewing many snap-frozen methods, Bioss experts recommend the following means for those who want to embed their samples by themselves in a research laboratory without special frozen apparatus (This method has the advantage of very rapid freezing.):
Note: DO NOT use Methanol, Ethanol, or Acetone instead of isopentane/2-methylbutane. Once OCT contacts with Methanol, Ethanol, or Acetone, you will not be able to freeze it down at -20°C.
2.1 Frozen embedding unfrozen tissue in OCT compound
Embedding frozen tissue is similar to embedding unfrozen tissue, except that you must freeze down the frozen tissue in the OCT compound as soon as possible without any delay whenever two of them touch each other. Otherwise, a bigger portion of the frozen tissue will experience a freeze-thaw-freeze cycle, and ice crystals might form inside of it and result in a very bad morphology due to the ice crystal artifact.
Note: Frozen tissues can be prepared using a similar way to embedding unfrozen tissue in the OCT compound. The difference is that you don’t need to add OCT compound.Storage:
The frozen blocks can be temporarily stored in dry ice. Transfer the blocks to a liquid nitrogen storage tank (Years) or -80°C freezer (Months). From this point over, the sample should never be thawed unless there is a specific requirement.

Rather than monoclonal antibodies, experienced scientists prefer to use polyclonal antibodies in IHC/IF assays
Top 7 Transferable Skills for PhDs in Both Research and Non-Research Industry Positions
Thank you for visiting Bioss Antibodies™ in AAI 2016 in Seattle! Check out our Immunology related antibodies here!